Configuration
CAST SBOM Manager provides both application interface configuration and file-based configuration options to customize your experience.
Application Preferences
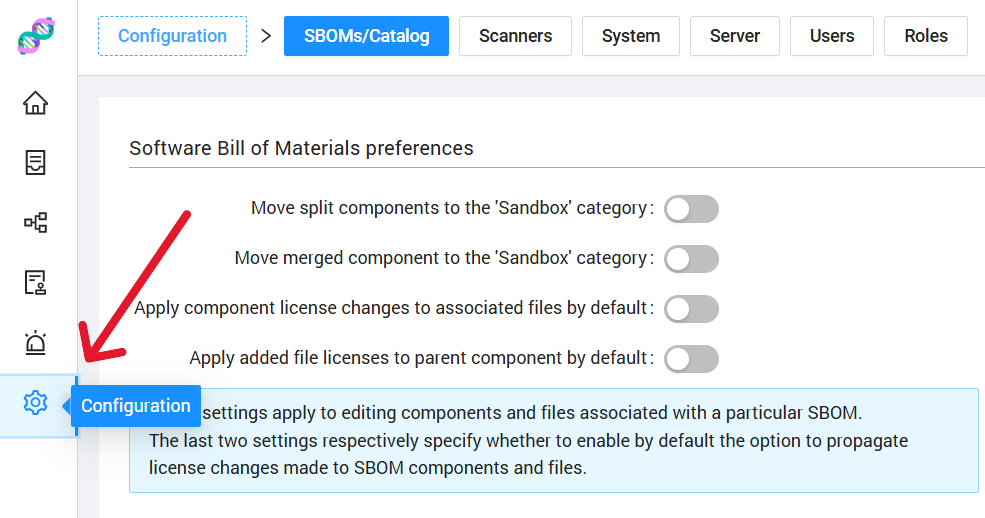
You can configure various application settings through the SBOM Manager interface. Access these settings by clicking the Configuration icon in the left sidebar navigation.
The Configuration section includes the following tabs:
- SBOMs/Catalog - Configure SBOM and catalog behavior preferences
- Scanners - Set default scan locations and paths
- System - View system and application information (read-only)
- Server - Configure server connection type and authentication
- Users - Manage user accounts (multi-user mode only)
- Roles - Manage user roles and permissions (multi-user mode only)
SBOMs & Catalog Preferences
Configure how SBOM Manager handles SBOM creation and catalog operations.
Bill of Materials Preferences
These settings control default behaviors when creating and managing SBOMs:
Component Splitting
- Move split components to 'Sandbox' category - Automatically categorize components that have been split during analysis
- Move merged components to 'Sandbox' category - Automatically categorize components that have been merged
License Management
- Apply component license changes to associated files by default - When you change a component's license, automatically apply the change to all associated files
- Apply added file licenses to parent component by default - When you add a license to a file, automatically apply it to the parent component
Default Behaviors
These settings apply by default to enable the option to propagate license changes made to BOM components and files. The last two settings respectively specify whether to enable by default the option to propagate license changes made to BOM components and files.
Catalog Preferences
Control how the Component Catalog interacts with your SBOMs:
Component Management
- Move split components to 'Sandbox' category - Automatically categorize split components in the catalog
- Move merged components to 'Sandbox' category - Automatically categorize merged components in the catalog
- Apply changes to linked BOM components by default - When updating a catalog component, automatically update all SBOMs using that component
License Propagation
- Apply component license changes to associated files by default - Propagate catalog component license changes to associated files
- Apply added file licenses to parent component by default - Apply file license additions to parent catalog components
Catalog Updates
These settings apply to editing components and files associated with the Catalog. The last two settings respectively specify whether to enable by default the option to propagate license changes made to Catalog components and files.
Scanner Preferences
Configure default paths and locations for scanning operations.

Default Scan Locations
Root Folder
- Path - The default root directory used as the starting point for file system scans
- Click Select to browse and choose a folder
- This path is used as the root of the file system when selecting the codebase to scan
Maven Repository Folder
- Path - Location of your local Maven repository
- Click Select to browse and choose a folder
- This path is used to facilitate the retrieval of component information when using the Maven scanner
- Must point to the folder where the project artifacts are stored (e.g.,
C:\Users\<user>\.m2\repository)
Maven Configuration
Setting the Maven repository folder helps SBOM Manager access dependency version information more efficiently during Maven-based scans.
Server Configuration
Configure the server connection type and authentication method for SBOM Manager.
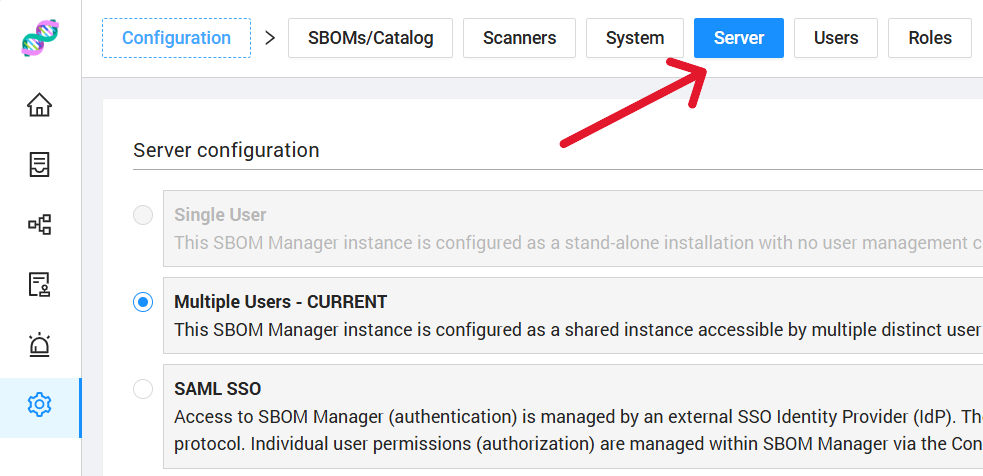
The Server Configuration allows you to set how users access SBOM Manager:
Connection Types
Single-User Mode
- Standalone desktop installation
- No authentication required
- One user per installation
- Best for individual developers or personal use
Multi-User Mode
- Shared server installation
- User authentication required
- Multiple users can access the same instance
- User and role management available
- Best for teams and organizations
SAML/SSO Mode
- Enterprise single sign-on integration
- SAML 2.0 authentication
- Centralized user management through identity provider
- Best for enterprise deployments with existing SSO infrastructure
SAML Configuration
When using SAML/SSO Mode, you must provide:
Metadata URL
- URL to your SAML Identity Provider's metadata XML
- Example:
https://your-idp.com/saml/metadata.xml - This URL provides SBOM Manager with the necessary SAML configuration to integrate with your identity provider
Server Mode Changes
Changing the server connection type requires application restart and may affect existing user sessions. Switching between modes should be done during planned maintenance windows.
Multi-User Features
When using Multi-User or SAML mode, additional tabs become available in the Configuration section:
- Users tab - Manage user accounts, permissions, and access
- Roles tab - Define and manage user roles and permission sets
To save server configuration changes, click the Save button. You will be prompted to confirm the change as it requires an application restart.
System Information
View detailed information about your SBOM Manager installation and system environment.

The System Information page displays:
Application Details
- Version - SBOM Manager version number
- User directory - Installation user directory
- User home - User home directory path
System Information
- OS name - Operating system (e.g., Windows 10, Linux)
- OS version - Operating system version number
- OS architecture - System architecture (e.g., amd64)
- IP address - Local IP address
Java Environment
- Java version - Installed Java Runtime Environment version
- Java home - JRE installation directory
- Java vendor - JRE vendor information
- JVM version - Java Virtual Machine version
- JVM vendor - JVM vendor information
System Memory
- Total system memory - Total RAM available
- JVM max heap size - Maximum heap memory allocated to the application
- JVM heap size - Current heap size
- JVM used memory - Memory currently in use
- JVM free memory - Available heap memory
Browser Information
- Browser name - Web browser being used
- Browser version - Browser version number
- User agent - Complete user agent string
- Screen resolution - Display resolution
- Browser resolution - Browser window resolution
TIP
Use this information to verify your system meets the minimum requirements and troubleshoot any performance issues.
Technical Configuration (scar.yml)
CAST SBOM Manager also stores configuration in a user-specific settings file that is automatically created during initial setup. The scar.yml configuration file stores advanced technical settings for CAST SBOM Manager.
Configuration File Location
- Location:
~/.scar/scar.yml(in your home directory) - Created: Automatically on first startup
- Purpose: Stores technical configuration and application settings
Advanced Configuration
Most users will not need to modify this file directly. Use the Application Preferences interface described above for common configuration tasks.
Configuration Structure
All configuration settings are nested under the following structure:
sca:
  scar:
    # Configuration fields go here
Core Configuration Fields
Application Mode
sca:
  scar:
    mode: INITIALIZED
Possible values:
UNINITIALIZED- Application not yet set upINITIALIZED- Application configured and ready to use
This field is automatically set during the initial setup process.
Connection Type
sca:
  scar:
    connectionType: SINGLE_USER
Possible values:
SINGLE_USER- Single user mode (default for desktop installations)MULTI_USER- Multi-user mode with SAM account authenticationSAML_USER- SAML/SSO authentication mode
Connection Type Configurations
SINGLE_USER Mode
For standalone desktop installations:
sca:
  scar:
    mode: INITIALIZED
    connectionType: SINGLE_USER
    samUser:
      id: <user-id>
      email: user@example.com
      secretKey: <secret-key>
MULTI_USER Mode
For multi-user environments with SAM account authentication:
sca:
  scar:
    mode: INITIALIZED
    connectionType: MULTI_USER
    samUser:
      id: <sam-account-id>
      email: admin@example.com
      secretKey: <sam-secret-key>
SAM User Fields:
id- SAM account identifieremail- Account email addresssecretKey- API secret key for authentication (can be empty)
SAML_USER Mode
For enterprise SSO/SAML authentication:
sca:
  scar:
    mode: INITIALIZED
    connectionType: SAML_USER
    saml:
      registrationId: reporter
      metadataLocation: https://your-idp.com/saml/metadata.xml
SAML Fields:
registrationId- SAML registration identifier (default: "reporter")metadataLocation- URL to your SAML Identity Provider's metadata XML
Optional Configuration Settings
Browser Auto-Open
sca:
  scar:
    openBrowser: true
Set to true to automatically open your default web browser when the application starts (default: true).
Advanced Settings
These settings are typically configured automatically but can be adjusted if needed:
sca:
  scar:
    proxyPort: -1
    threadPoolAsync:
      count: 32
      name: "SCAR-ASYNC"
    bom:
      builder:
        parallel: 1
    kpi:
      recompute:
        parallel: 10
Advanced Fields:
proxyPort- Proxy port configuration (default: -1)threadPoolAsync.count- Number of async threads (default: 32)bom.builder.parallel- Parallel BOM builder threads (default: 1)kpi.recompute.parallel- Parallel KPI computation threads (default: 10)
Technical Configuration
The application runs with pre-configured defaults that work for most users:
- Application Port: 9001
- Database: Embedded OrientDB (automatically configured)
- Database Ports: 2424-2430 (automatically selected)
- Session Timeout: 30 minutes
- Maximum File Upload Size: 500MB
These technical settings are embedded in the application and optimized for typical usage.
Having trouble? See the Troubleshooting Guide for solutions to common installation and startup issues.