Multi-User Mode
CAST SBOM Manager supports multi-user mode, allowing teams to collaborate on SBOM creation and management with role-based access control. This guide covers setup, user management, role configuration, and team workflows.
Overview
Multi-user mode enables:
- Shared server installation accessible by multiple users
- User authentication and login system
- Role-based access control with granular permissions
- Centralized SBOM repository for team collaboration
- User and role management interface
When to Use Multi-User Mode
- Your development team is working on shared projects
- Your organization requires centralized SBOM management
- You need access control with different permission levels
- Your team wants to standardize SBOM practices
Enabling Multi-User Mode
Prerequisites
Before switching to multi-user mode:
- SBOM Manager must be installed and initialized
- You must be the current owner/administrator
- A CAST Software Account Manager (SAM) account is required
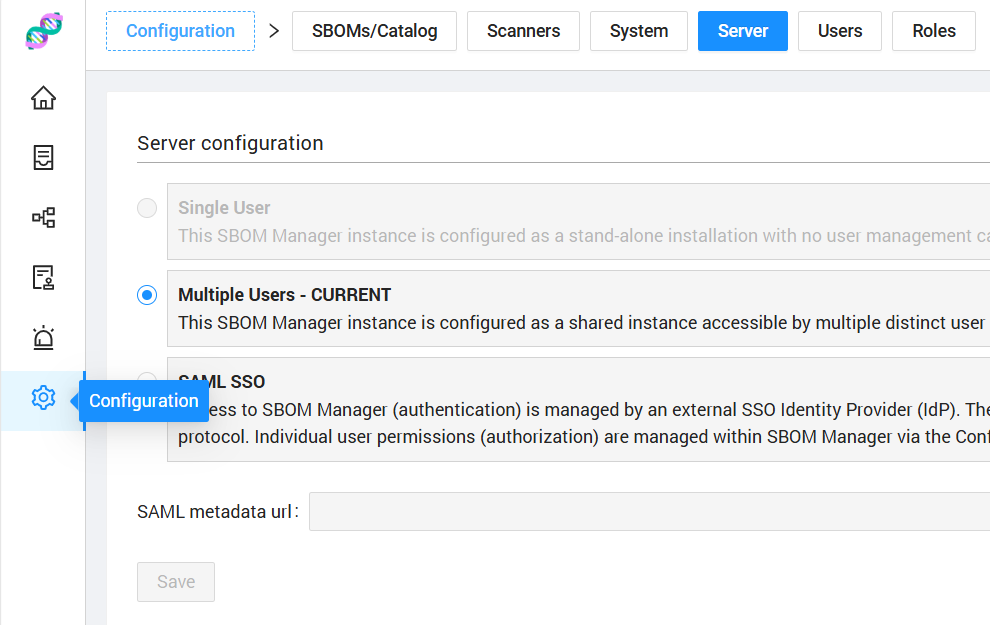
Switching from Single-User to Multi-User
- Navigate to Configuration → Server tab
- Under Connection Types, select Multi-User Mode
- Click Save
- Confirm the change (the application will restart)
SAM Account Required
Multi-user mode requires a linked CAST Software Account Manager (SAM) account. This should be configured during initial application setup. If you don't have a SAM account linked, you'll need to obtain one from CAST before enabling multi-user mode.
Application Restart Required
Changing connection types requires an application restart. All active sessions will be terminated. Plan this change during a maintenance window.
Authentication and Login
First Login
After enabling multi-user mode:
- The application redirects to the login page at
http://localhost:9001 - Login with the owner account credentials you configured
- As the owner, you can now create additional user accounts
User Login
Users access SBOM Manager by:
- Navigating to
http://localhost:9001(or the configured server URL) - Entering their email address and password
- Clicking Login
Password Management
Changing Your Password
Users can change their own password:
- Click on the user menu (top right)
- Select Change Password
- Enter:
- Current password
- New password
- Confirm new password
- Click OK
Resetting Owner Credentials
If the owner account password is forgotten:
- On the login page, click Forgotten Credentials
- Follow the owner credential reset process:
- Confirm you want to reset the owner account
- Enter the owner's email address
- Enter a new password for the owner account
- The owner password will be updated
Managing Users
Accessing User Management
- Navigate to Configuration → Users tab
- This tab is only visible in Multi-User or SAML mode
Permission Required
Only users with the User write permission can create, edit, or delete user accounts.
Creating a New User
- Click Create User button
- Fill in the user details:
- Email - User's email address (used as login identifier)
- Password - Initial password for the account
- Confirm Password - Password confirmation
- Role - Assign a role (defines permissions)
- Enabled - Check to immediately activate the account
- Click OK
The new user can now login with their email and password.
User Limits
Multi-user mode enforces user limits based on your SAM account configuration. If you've reached the maximum number of users, you'll need to delete inactive users or contact CAST to increase your limit.
Editing a User
- In the Users table, click the Edit action for a user
- You can modify:
- Role - Change the user's role assignment
- Enabled - Enable or disable the account
- Click OK to save
Email Changes
- In Multi-User mode: Email addresses can be changed
- In SAML mode: Email addresses are managed by your identity provider and cannot be changed
Disabling vs. Deleting Users
Disabling a User: Edit the user and uncheck the Enabled checkbox.
- Prevents login without deleting the account
- Preserves user history
- Can be re-enabled later
- Best for temporary access removal
Deleting a User: Click the Delete action in the Users table.
- Permanently removes the user account
- Cannot be undone
- Use when the user will never need access again
Cannot Delete Owner
The owner account cannot be deleted. This ensures there is always at least one administrator with full access.
User Status Indicators
In the Users table, users are displayed with status tags:
- Owner (Gold crown icon) - Special administrator account
- Enabled (Green) - Active user account
- Disabled (Red) - Inactive user account
Managing Roles
Accessing Role Management
- Navigate to Configuration → Roles tab
- This tab is only visible in Multi-User or SAML mode
Understanding Role Types
SBOM Manager has three types of roles:
| Role Type | Description | Can Edit | Can Delete |
|---|---|---|---|
| Owner | Full administrative access to all features | No | No |
| Default | Pre-configured standard user role | No | No |
| Custom | User-defined roles with custom permissions | Yes | Yes |
Role Assignment
Each user must be assigned exactly one role. The role determines what actions they can perform in the application.
Creating a Custom Role
- Click Create Role button
- Configure the role:
- Name - Descriptive role name (e.g., "SBOM Viewer", "Security Analyst")
- Permissions - Select which permissions to grant (see below)
- Click OK
Permission System
Permissions control access to features within SBOM Manager. Each permission group has two levels:
- Read - View and access data (always granted)
- Write - Create, edit, and delete data (must be explicitly granted)
Available Permission Groups
| Permission Group | Read Access | Write Access |
|---|---|---|
| BOM | View SBOMs and their contents | Create, edit, delete SBOMs |
| Catalog | View catalog components | Add, edit, remove catalog components |
| License | View licenses and policies | Create, edit licenses and policies |
| Vulnerability | View vulnerabilities | Create, edit, delete vulnerabilities |
| User | View users and roles | Manage users, roles, and configuration |
Permission Examples
Read-Only Role (All switches off)
- Can view all SBOMs, components, licenses, vulnerabilities
- Cannot create or modify anything
SBOM Creator Role (BOM write enabled)
- Can create and manage SBOMs
- Cannot modify catalog or licenses
Security Analyst Role (Vulnerability write, License write)
- Can manage vulnerabilities and license policies
- Cannot create SBOMs or manage catalog
Administrator Role (All switches on)
- Full access to all features except user management
Editing Custom Roles
- In the Roles table, click Edit for a custom role
- Modify the name or permissions
- Click OK to save
Changes apply immediately to all users assigned to that role.
Deleting Custom Roles
- In the Roles table, click Delete for a custom role
- Confirm the deletion
Role Deletion
You cannot delete a role that is currently assigned to users. First reassign those users to a different role, then delete the custom role.
SAML/SSO Integration
For enterprise deployments, SBOM Manager supports SAML 2.0 single sign-on.
Enabling SAML Mode
- Navigate to Configuration → Server tab
- Select SAML/SSO Mode
- Provide:
- Metadata URL - Your identity provider's SAML metadata XML URL Example:
https://your-idp.com/saml/metadata.xml
- Metadata URL - Your identity provider's SAML metadata XML URL Example:
- Click Save (application will restart)
SAML Mode Differences
When using SAML authentication:
- Users are authenticated through your identity provider
- Email addresses cannot be changed (managed by IdP)
- User enabled/disabled status is managed by IdP
- Local password management is disabled
- Roles and permissions are still managed within SBOM Manager
Troubleshooting
Common Issues
Cannot Create Users
If the "Create User" button is disabled:
- Check you have the User write permission
- Verify you haven't reached the user limit (check SAM account)
- Ensure your SAM account is connected and active
Users Cannot Login
If users report login failures:
- Verify the account is enabled (not disabled)
- Check the email address is correct
- Confirm the password is correct (try password reset if needed)
- Check the application is in the correct mode (Multi-User or SAML)
Permission Denied Errors
If users see permission errors:
- Verify the user's role has the required permission
- Check role permissions in Configuration → Roles
- Reassign the user to a role with appropriate permissions
Owner Account Locked Out
If you've lost access to the owner account:
- Use the Forgotten Credentials feature on the login page
- Follow the owner credential reset process
- Create a new password for the owner account